I have shared many rooms in our home over the past couple years on my blog but have never shown the kitchen. It is attached to the dining room.......
Which I love........
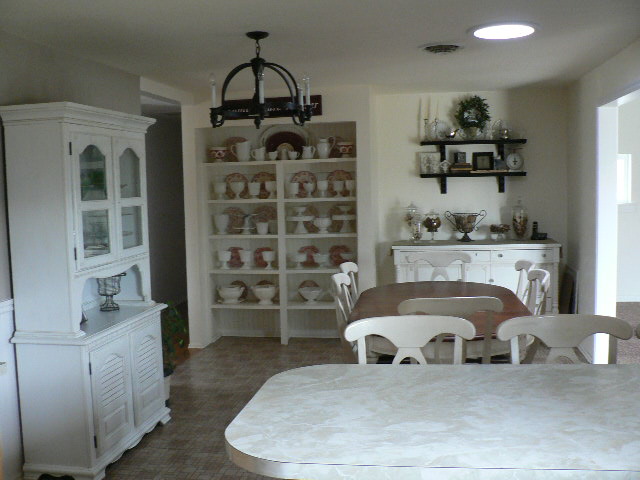

There is a reason I have never shown you what's on the other end of the dining room.
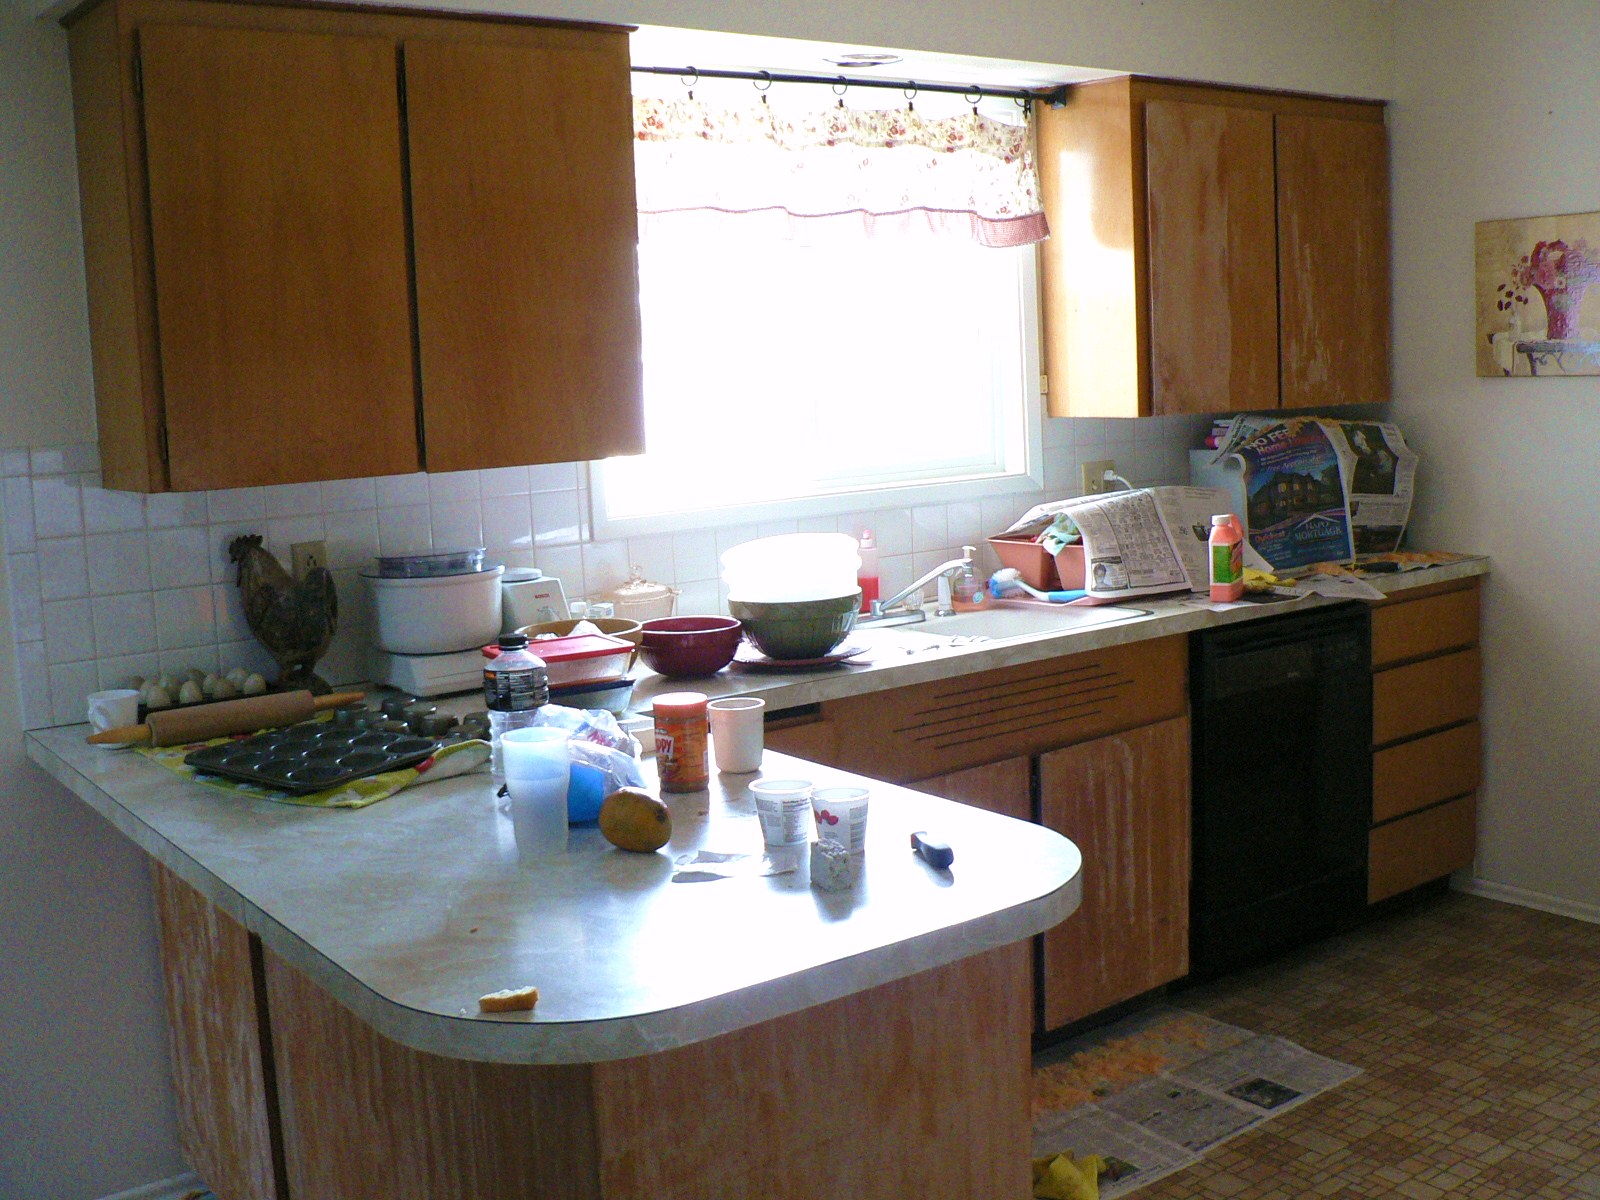
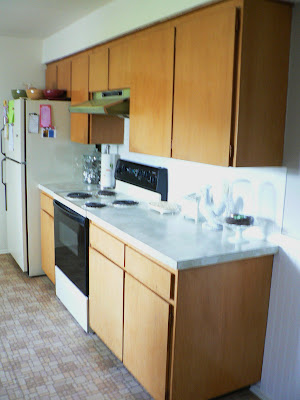
We have lived in our home for nine years.This summer my goal was to attack those orangish worn cabinets and bring the kitchen up-to-date. The hood above the range was avocado green. It's just a dingy out-dated kitchen. I had to do it on practically no budget. I spent less than $200 on everything.
So here goes.


The finish on the lower cabinets was very worn.

Two and a half weeks ago I started the tedious task of stripping the thick orange top coat. I had heard good things about Cirta Stripping Gel and it didn't disappoint. I'd brush it on and within 20 seconds it would bubble. This stuff saved so much work.


Then everything was sanded smooth. What a dusty mess this was. The entire kitchen was covered in a thick covering of dust.

I added trim to all 15 cabinet doors and 19 drawers. These were sheets of some kind of pressboard my dad and I cut into strips. I glued and shot 3/4 inch nails in with my gun. Some of the doors were not square. I'd cut a piece of trim for one side and fit it to the other side to see if it matched. Some of them were off by 1/4 inch in length.


The drawers after being stripped.....

....and after being sanded and trim added.
Then came the task of adding wood filler to the nail holes and mitered corners (because they weren't square). Then I sanded them again.

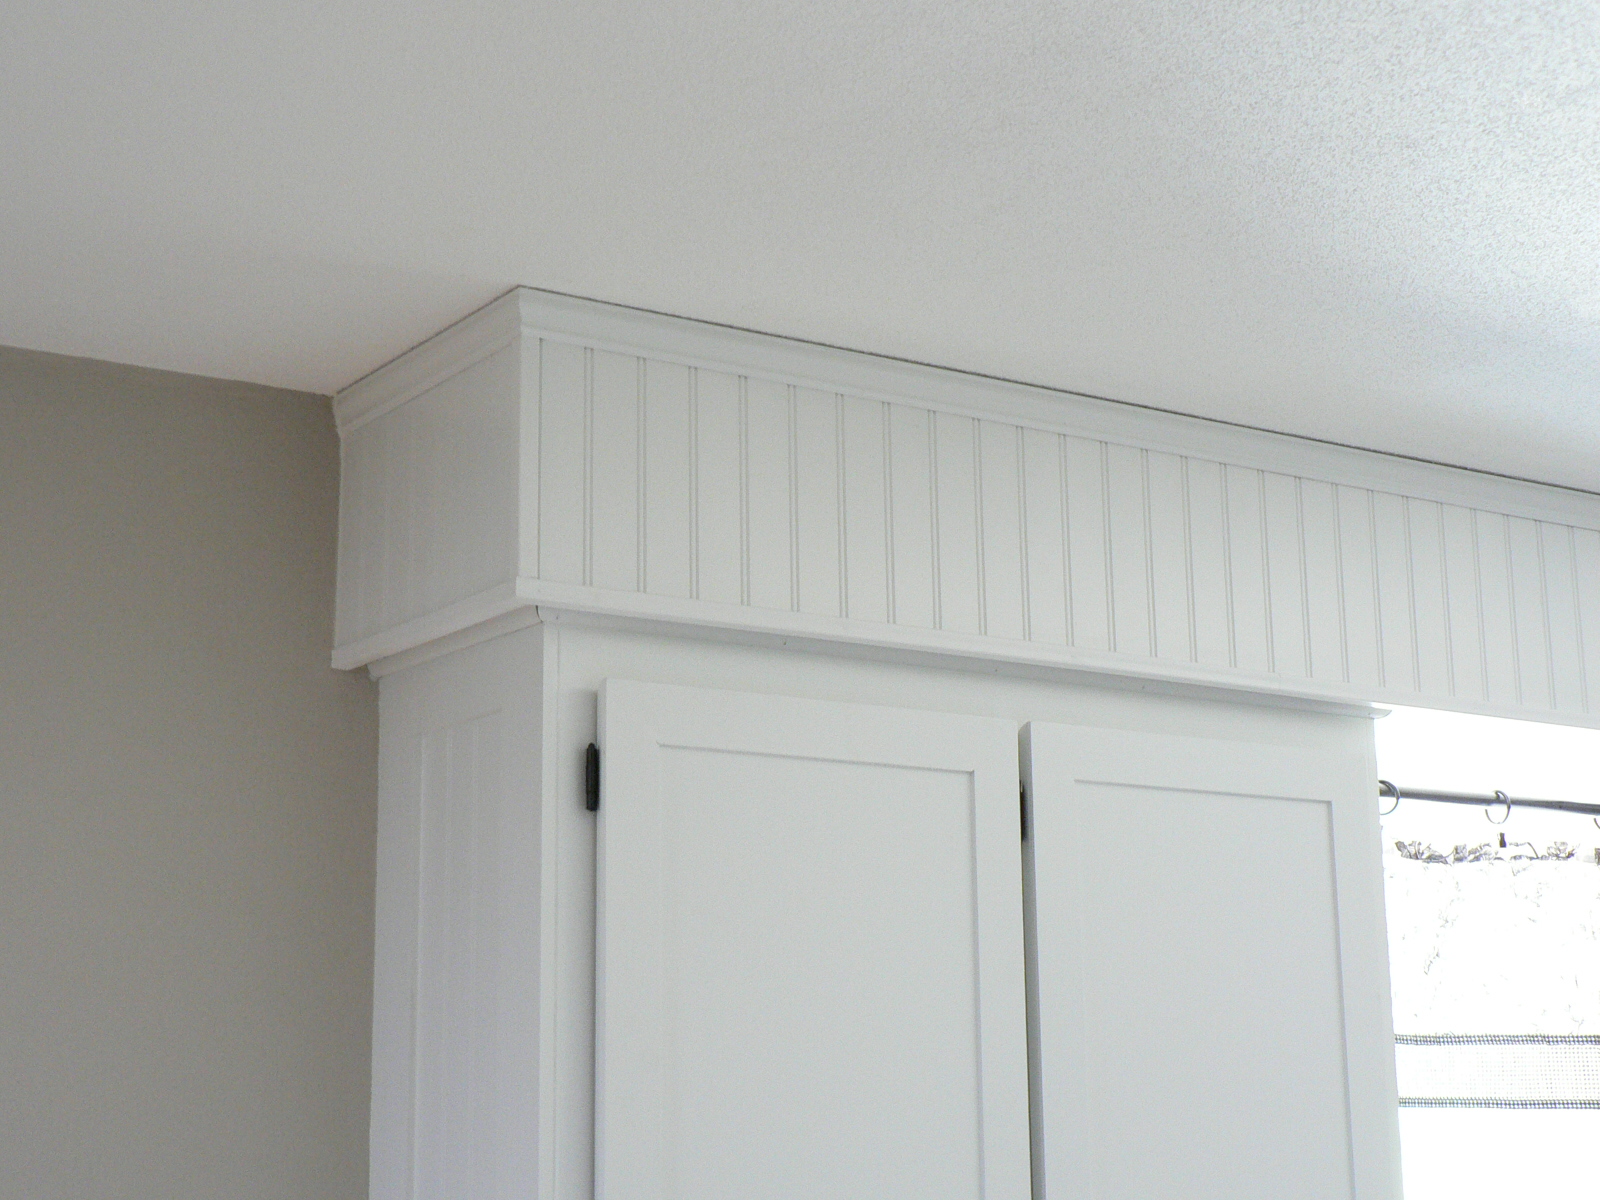
I had 3 inch mdf board strips left over from the board and batten treatment I did on the living room walls last summer. I used those to make frames around the bar and the ends of the cabinets. Then I added beadboard inside of those. I wouldn't have needed to strip the bar and cabinet ends but I was unsure at the time exactly what I was going to do. Oh well, I'm sure the glue stuck better than it would have to the glossy finish it had (I also nailed it). I had to caulk around the inside of the trim where the beadboard and trim meet. Again, I had to fill the nail holes and mitered corners, then sand.

I primed everything with Kilz oil-based primer. I wanted to lock in the orange stain and have better durability. The only disadvantage is that I had to clean my brush each day with paint thinner. I also learned the second day to wear gloves. It does not come off skin very well.

After priming I gave everything a light sanding.

After priming came the easy part. I sprayed the doors and drawers. It went quickly but took several days since I didn't do them all in one day and had to spray both sides. I got impatient waiting a day for one side to dry so I could flip it over and spray the other side. I hung a couple cabinet doors and decided it was too much white. I wanted the trim to pop so I lightly sanded the edges of the trim to make it stand out. Then I gave everything two coats of matte polycrylic to seal it.

Here's one more look at the BEFORE


I have about a half days work touching up paint and such. I still need to refinish the door, change the outlets to white, and install a new kitchen light fixture. It has been an exhausting almost three weeks but I couldn't be happier with the results. It is just as I had imagined.
I'm linking up with Strut Your Stuff Thursday, Transformation Thursday, Open House Thursday, Furniture Feature Friday, Frugal Friday, Show and Share Day, and Feature Friday.


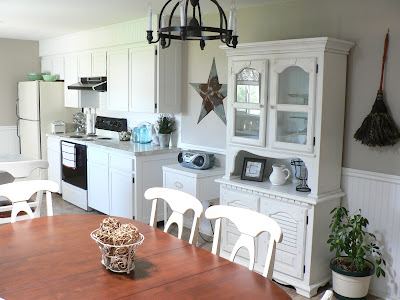
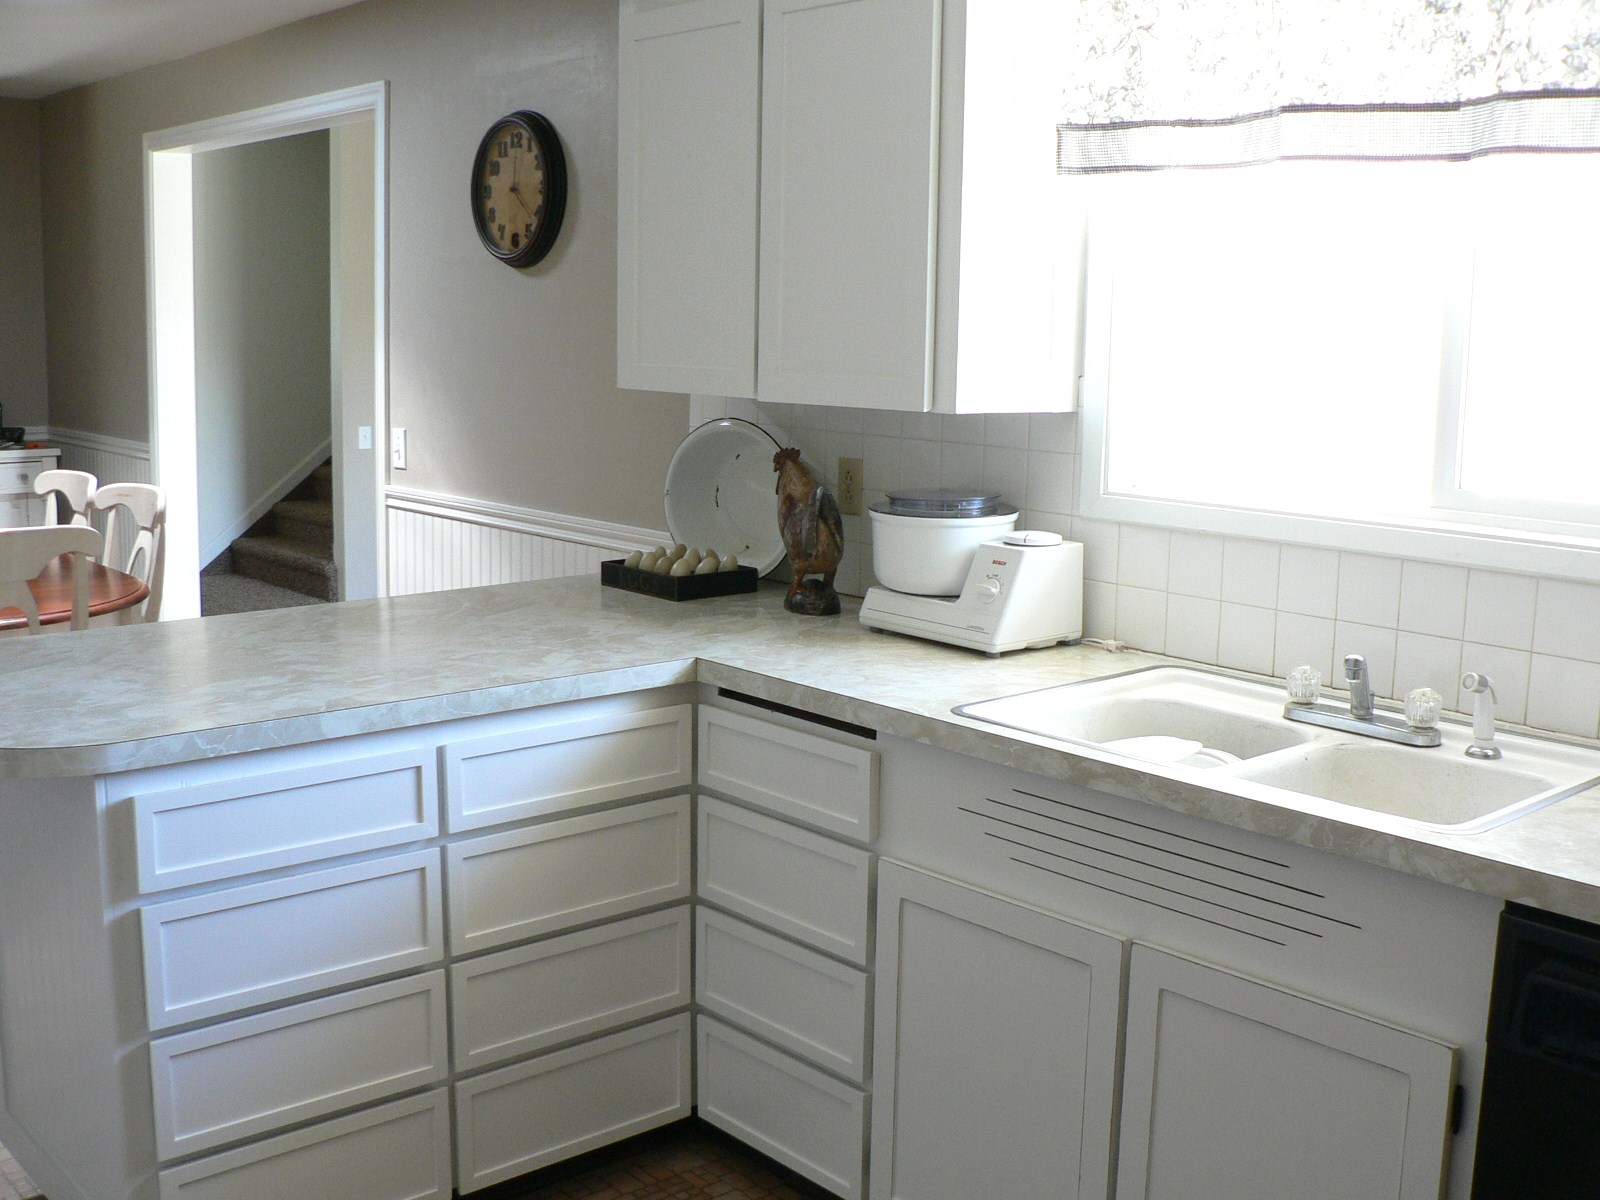
And the AFTER
It's so bright and cheery

I did 95% of the work on this redo. My husband made over the oven hood. He sprayed it down with degreaser and scrubed it. Then took it to the car wash and pressure washed it before spraying it black.

I have plans for the door. I am going to add some decorative moulding and paint and distress it. It's like the elephant in the room but I couldn't wait to share pics.


I also added beadboard to the kitchen and dining room walls and painted the upper portion a tan / gray color.


I made three beadboard panels with chunky moulding on the back side of the bar. The left panel is actually a cabinet door. It holds games.

There's an empty space where a cutting board used to be. It was gross and we threw it out when we moved in.


I found these three vintage moulding frames at a yard sale last summer for 50 cents each.

I used to hate the soffits until I added the beadboard and trim. Now they are one of my favorite parts of this make over.
I found the old enamel wash basin at Goodwill a few months back for $4.50.

It's hard to see with the sun but I picked up the black and white toile valance at a yard sale for $2.


The accesories were fun to come up with. I shopped the house for things I already had.


I love the ends of the cabinets. The beadboard and trim add so much to the once flat ends.


A view from the family room.


I scored 6 large metal stars at a yardsale last week for $3 for all. The blue rusty one is my favorite. The antique feather duster was at another yardsale for $2.

I have about a half days work touching up paint and such. I still need to refinish the door, change the outlets to white, and install a new kitchen light fixture. It has been an exhausting almost three weeks but I couldn't be happier with the results. It is just as I had imagined.
I'm linking up with Strut Your Stuff Thursday, Transformation Thursday, Open House Thursday, Furniture Feature Friday, Frugal Friday, Show and Share Day, and Feature Friday.
I looooooove it!! It looks so much better! Great job!!
ReplyDeletewowie!!! you did a fabulous job!! goreous!
ReplyDeleteI am in awe. I revamped my cabinets last year, just sanding, painting and waxing, and that was hard enough. Well done you. It looks like a new kitchen. I hope you found it fun as well. And can I just say what a great posture you have sitting on the kitchen floor! xx
ReplyDeleteWow!! So much hard work and it looks amazing, so much brighter and crisp! Great great job!!
ReplyDeleteStanding beside my desk chair and applauding~! It looks fabulous and I am so happy for you..
ReplyDeleteso much hard word resulted in such bright, cheerful beauty. Yeaaaaaaaaaaaaaaa YOU..
You did a TON of work and the outcome was well worth (you know...from where I sit). It's like a brand new kitchen!!
ReplyDeleteLove it! You did a lot of work but you did a fabulous job!!
ReplyDeleteWow, this turned out amazing!!!! What a difference the trim and white paint made to those cabinets. Even better that all of that was accomplished with $ 200.00. I love it!
ReplyDeleteBeautiful! I'm a sucker for white kitchens =) I really like your wall color too.
ReplyDeleteThat looks like it was a TON of work, but it looks amazing. And for under $200 I am completely impressed. I love the beadboard you added around your kitchen. We plan to use beadboard for our backsplash in our kitchen once we finally get the countertops tiled!
ReplyDeletewow what a wonderful transformation.now you have a kitchen you can be proud of ;).love love it. you might want to add some chalk board to that door would be very functional and would look great with the other black accents.
ReplyDeleteabsolutely gorgeous! I love the finished cabinets. so clean and pretty. I'd love for you to link up to my feature friday link up. www.blissfulanddomestic.blogspot.com
ReplyDeleteThat is an amazing transformation! It looks fabulous! I love the trim around the doors & drawers. The bead board looks so nice too! I love bead board! I have a party going on over at my blog if you want to join! I'd love to have you! Check it out under the "Stache Party" page on my blog: mylilpumpkinpatch.blogspot.com
ReplyDeleteHoly guacamole! That was a LOT of work! It turned out beautifully and now ties in with the gorgeous dining area. Love those built ins by the way! Ahhh swoon. I hope you will come share this at my VIP party today. http://designergarden.blogspot.com/2011/08/vip-party-22.html
ReplyDeleteGreat job! You're hard work paid off!!
ReplyDeleteArlene, Wow..what a beautiful transformation! It doesn't even look like the same kitchen. I love the trim and beadboard you added and the cabinets look wonderful painted. Thank you for linking to my Open House party and enjoy your new kitchen!
ReplyDeletexo,
Sherry
WOW! WOW! WOW!!! This looks fantastic! and under $200--how encouraging is that! It looks sooooo nice! Thanks for sharng. I am your newest follower. Hope you can visit me sometime.
ReplyDeleteWow, such a FABULOUS JOB, I'm so impressed and all BY YOU!! You're a talented gal, my goodness. Your kitchen looks gorgeous! Have a fun weekend. FABBY
ReplyDeleteOh my gosh! You did an amazing job and what a lot of hard work! The trim and the beadboard looks fabulous! You should be so proud of the amazing work you put into this project and the results are so worth it! Have a wonderful weekend! Angie xo
ReplyDeleteCan I say, "Holy Crap!"?
ReplyDeleteYou should be really proud of yourself....that looks like a ton of work and it really shows!
Bravo! I am so impressed! You did a great job. The trim makes a HUGE difference. And my goodness, you have a LOT of drawers in that kitchen. I have 3 little ones!
ReplyDeleteI really really like this post. I want to paint my cabs, too, but have been hesitant. It is a huge undertaking and I don't know if I am truly up for it yet. Hats off to you, you have great step-by-step photos here and I think it's good that you even talked about the pitfalls. I am signing onto your blog as a follower (my icon is the chicken) and I will be in touch. I hope you will stop by, too. Regards, Andrea @ townandprairie.blogspot.com
ReplyDeleteWhoa, wait. Did you do all of these by yourself or did you have help? That’s a lot of work, dear. I wish that you did ask for help. Anyway, you did great! I love the transformation. Your kitchen looks cleaner and roomier than before. Way to go! I take my hat off to you, my friend!
ReplyDeleteKristopher Diss
It looks SO GOOD! Like a picture from a magazine!
ReplyDeleteNorth East Factory Direct
Cleveland Kitchen Cabinets
Modern Furniture Cleveland
Your kitchen is absolutely stunning! You did an amazing job.
ReplyDeletePoulin Design Center
Kitchen Cabinet Santa Fe
Kitchen Remodel Albuquerque
Great details about kitchen-remodel.
ReplyDeletethanks for sharing this really the contant is amazing
informative,interesting , motivative also which was i am looking for . please keep updating step by step .
Best Seller American simple Twisted Metal Bohemian necklace
What a great job! I'm in the middle of redoing my cabinets and wanted to see others who used bead board. Found yours an what an inspiration! I'm a lot slower since I'm older but being retired, I have lots of time so no hurry here. Love your kitchen!
ReplyDeleteAre you going to put hardware on the cabinets and drawers? To me, it looks unfinished. Choose your hardware color to go with other hardware in the home. Ebay is my go-to for that. Much less than Lowes or Home Depot. Otherwise, you did a super job.
ReplyDeleteGreat job. The bead board soffits are a great idea. Looks great without handles but handles would also look wonderful
ReplyDeleteThis is very nice blog post. Thanks for sharing this great blog with us. One of the biggest fears people have when considering kitchen remodeling Cleveland revolves around losing storage space—but don’t let that stop you from redesigning! Let us help in your kitchen remodel!
ReplyDelete