Friday, December 18, 2009

Christmas Decor


I made the Jute covered cones  and the tall topiary below!!!

The tree is mostly decorations the kids have made in school, scouts, etc. over the years.  It's a sentimental tree.

I also made the jute covered balls below.

I'm having fun with my newish copycat Ballards Designs cafe shelves we made.  This is kind of a dark corner in the dining room and the flash really makes the photos look washed out.

All of the embroidery you will see in this post I made.  I am addicted!!  It adds a beautiful and personal touch for next to nothing

My local thrift store has a very large wood box out front that they put free items in.  For some reason they must have thought this vintage santa boot was to shabby.  I have found the best stuff in that box.


I got this cute snowman at TJ Maxx ($6) and the glittery cardinals at Shopko ($2) this year.

My Williams Sanoma knock-off hurricanes from the dollar store.  See my previous post for how I made these beauties for $3 each.

I found this large berry wreath at the local thrift shop for $2.  Score!!!  The noel I found a TJ Maxx this year.

I found this square boxwood wreath at Goodwill for $2 and added the ribbon.

I found the cute little vintage looking tree at the local thrift store for  $1.50.  The women behind the counter said the local nursery donated the rest of their Christmas stock.

My 50 cent snowman decoration on my $2 thrift store cake stand.

Did I mention I love doing embroidery!


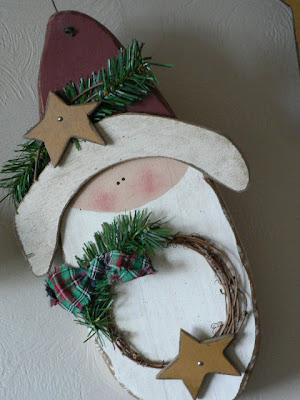
I made this cute santa.


MERRY CHRISTMAS
I'm linking up at the Shabby Nest's Frugal Friday Holiday Edition and Nester's Christmas Tour of Homes.

Wednesday, November 18, 2009

Dollar Store Knock Off

As I was reading Melissa's blog the other night I loved the glass hurricanes she made using dollar store materials.  Yesterday I made it to the dollar store and there were two candle sticks left and only 6 glass hurricanes.  There were probably 20 candles left.  Last night I glued my candle sticks to the bottom of the hurricanes with an epoxy and let them dry over night.  I love how they turned out.


Then I decided to play with some burlap scraps I had left over from the project in my previous post.  So I tied a strip to the bottom of each hurricane.


I finally decided on burlap around the hurricane itself.

It will be so fun to change these up for different seasons and holidays.

Wednesday, November 11, 2009

Family Tree

I've been working on a big project while the hubby has been gone hunting for the week. I wanted to get it all done and surprise him when he got back. It has been a lot of fun and I finished last night. It was actually hubby's idea to have this large wall (the stairs are behind it) in the new family room be a family tree wall. I was all for that idea.

Figuring out what to do with it was the hardest part. I knew it had to cost next to nothing. Most of the frames I already had. I painted 8 Goodwill frames I've had kicking around black then sanded the edges. Originally I was going to do all black but decided that would be too much. So I brought in some off-white and celery green ones I had in the bathroom and I loved the color combination. I only ended up buying 5 frames (the cream colored ones) at TJ Max for $4 each.


I made the family tree below by cutting out the tree and leaves on heavy cardstock. Our kids' names are written on the trunk and hubby and I's on the large branches.  Each leaf has a name on it. It is six generations of our ancestors.


I wanted to do some vinyl lettering but that was out of the budget so I came with my own version. I printed my words from the computer and taped them to the window then taped my burlap over top and traced around the letters with a black sharpie. Then I took a small paint brush and filled the rest of it in with black paint.


I also made this B and olive branches on burlap the same way as the others. I found this frame at Goodwill. It was $2. I just painted and sanded it. I loooove it!!!!


I'm hooking up over at Just a Girl, The Shabby Chic Cottage and Between Naps on the Porch.  Go check other fun projects!!!  I am also linking up at A Soft Place to Land for Do-It-Yourself Day.  I'm also hooking up with Layla's Favorite Post Party and Nester's Collections Party.

Thursday, October 22, 2009

Master Bath Sweat Equity

I picked up this mirror for $2 at a yard sale knowing I could transform it for the master bathroom.


I removed the middle pieces of trim.
Then had my dad add some molding we had left over from our addition to beef up the frame.


I painted it all and sanded the edges a bit.  Then I used a rag and wiped dark walnut stain over the entire piece before wiping it off.


Not bad for $2.  It will hang on the wall in our new master bath. (We're still under construction)


Everything we did in our addition was done on a budget but not cheaply.  We bought two unfinished oak cabinetry pieces at home depot for a reasonable price  About two weeks later I was in HD making a return when I noticed all of the unfinished oak cabinets were on clearence.  I had the receipt from our purchase in my purse and asked the lady at customer service if I she could refund me the difference since I had bought them two weeks prior.  She did.  I got $80 back.  Whoo-hoooo.

These were buggers to finish.  Let me tell you it was a loooong process. I sanded the heck out of the unfinished oak and it was as smooth as a babies bottom. Then I primed with Kilz primer. I got a good thick primer. After I primed, little slivers of wood stuck out everywhere. I couldn't believe it. Is that typical of unfinished wood??? So I sanded them all again. Smooth as can be and primed again. Still a little rough but I painted them anyway. Then I randomly sanded along the edges to get a slightly distressed look. I took a rag and rubbed dark walnut stain on the edges and very lightly on the entire piece. The final step was sealing them. If you are sealing a painted piece of white furniture NEVER ever use polyurethane. It will turn your furniture yellow. You must use polycrylic. It's about twice the cost but worth every penny. I love how these look. They turned out exactly like I'd envisioned and was worth all the work.


So here is the BEFORE


And here is the AFTER (before I painted and distressed the frame)

Oh yeah, and the brushed nickel light fixture was from Walmart for $35.
There were similar ones at Home Depot for $70.

Sunday, October 11, 2009

More Yard Sale Finds and Transformations

I picked up at Goodwill for $2.50 a while back.


I got online and printed out a large B (for our last name) and also printed an olive branch.  Then I taped the paper to the window and taped the burlap over top and traced around everything with a black Sharpie.  I used a small black paint brush and filled in the rest with paint.  I painted the frame black and roughed up the edges and I coudn't be happier with the way it turned out!!!!


Next transformation is this recipe holder I turned into a mail holder for my desk.  I sanded it down and painted it black.  Then I cut out some cute scrapbook paper for the front and sides and mod podged it on.  It now sits on the desk and holds mail.


 I picked up these large deer for $3.99 each. They are around 2 feet tall.  I can't wait to put them up at Christmas time.


I also found this Waverly Garden Room valance for $1.99.  I love this print.


This table reversible table runner was also $1.99 and is similar to the waverly print.  I also got two place mats that match for 25 cents each.


Remember this 8 x 10 shabby picture frame I picked up for $1.  It was from Target and brand new.  I whipped up this embroidery a couple nights ago and it fits nicely in my frame.  The little fall flower bouquet I picked up for $1 and the pumpkins were 25 cents each at my local thrift store.


Now for the big project I've been working on.  I'm kind of embarrassed to show the next picture. I think everyone has a place where things accumulate (I'm hoping so anyway). Ours is the desk in the dining room. It doesn't matter how often I clean and sort and purge. It always ends up a mess. It is the dumping grounds for mail, contents of the kids backpacks (papers, papers, and more papers), and all sorts of stuff. We haven't used that desk top computer for ages. It doesn't work for high speed internet and it is 8 years old. It just sits there taking up valuable space. The printer lies buried in a mountain of debre.


This huge junk pile sat next to my display of milk glass and did it no justice at all.


A couple weeks ago we moved the desk into the new family room and the mess now looks like this. Notice my cute mail holder on the desk doing its job.


So what happened to the void where the desk used to be???  The buffet which was on a different wall in the dining room was moved into the cubby where the desk stood.  So she moved from here to........


...............here.  And my biggest project this month was building these copy cat cafe shelves from the Ballard Designs catalog.  I did have the hubby help me with this one.


Every single thing on these shelves was bought second hand for very little.


After a week I decided to fall-ify the buffet.  I was getting kind of tierd of the toile runner on the buffet so I purchased a piece of burlap from Walmart and made a runner.  I love the rustic-ness of it.  Remember the $3 birdcage I found a few weeks back.  I have always wanted a black crow for Halloween and I finally bought one at Michaels last week for $4 (normally $10).  So here she sits in the bird cage atop a pumpkin.  The little haunted house was 50 cents, the candle holders $1 each, and the berry vine (I got two of these) 75 cents all at Goodwill.  And the best part is the buffet - she really loves her new look.


I'm still working on the wall where the buffet used to sit.
Happy Fall Y'all.
Powered by Blogger.